|
Thinking about building your own mobile space? Download the design plans to the right, and read on for advice about how to design and build your own mobile space!
|
| ||||
Planning THE project
What We Did: As we planned our mobile exhibit space, we thought a lot about our purposes. Our main purpose was to increase awareness of local architecture, and so the architectural features of a cure porch determined much about the design. Secondly, we wanted the Porch to help us document and share local history, and so we designed the Porch to function as an exhibit space and a mobile booth for our Oral History Project. Finally, we wanted to create a venue to share with other organizations. We researched other mobile projects, and spoke with possible partnering arts and culture organizations. We raised funds by writing grants and speaking with donors about our vision. We developed a budget and revised the budget as the plans came together.
How It Worked in Practice: We are very pleased to have a beautiful recreation of a cure porch! A talented engineer and designer carefully designed a strong and architecturally accurate structure. We are grateful for the hard work of talented carpenters, builders, and volunteers. We hired a full time staff person who worked hard to shepherd the project to completion and put it into practice.
Lessons Learned: We underestimated the time it would take to bring the project to fruition. From dream to completion it took 9 years! We underestimated the cost (we had hoped for $30,000, but it cost over $85,000). We underestimated the amount of work it would take to create a complete design and to build and install all the elements. Because construction took so long, the warranty on the elements we purchased ahead of time expired before installation. We continue to work to build connections so that the porch is widely used by other arts and culture organizations.
Making it Mobile
|
What We Did: Our first idea was to build the Porch on a box truck frame. However, we wanted to share this space with other organizations, and our insurance wouldn't allow anyone else to drive the vehicle. We also wanted to start with a base that we were sure would be strong enough. So we built the Porch on a trailer.
How it Works in Practice: The trailer was a good fit for our project. It would have helped to know that our insurance requires the towing vehicle to have hired car damage coverage. It turns out that most individuals and organizations don't have this coverage. To meet this requirement we have to hire a professional towing company to move the Porch. This costs almost $200 per event.
Our Suggestion: Insurance makes all the difference! Be aware of the cost of towing, and research your insurance coverage as you plan your project.
|
Accessibility
|
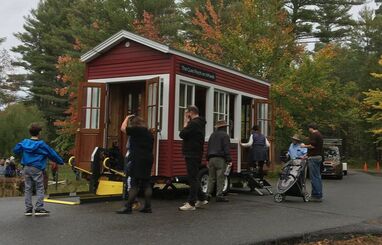
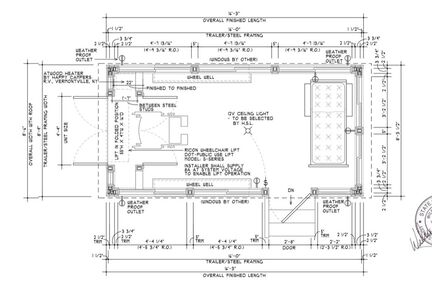
What We Did: Handicap accessiblity is important, and because our project was supported by a federal grant (National Endowment for the Arts) the space had to be fully accessible. This was one of the biggest challenges of the project. We did a lot of research and settled on a platform lift usually used on school busses. We purchased the Ricon S-Series wheelchair lift.
How it Works in Practice: The lift works great, and we are proud that we have a fully accessible space!
|
|
Our Suggestion: Get in touch with the local supplier for school buses in your area. (Your local school district should be able to give you a name and phone number.) Call around until you can get in touch with the person who installs lifts. They can help you order the lift and help your contractor with any questions on installation.
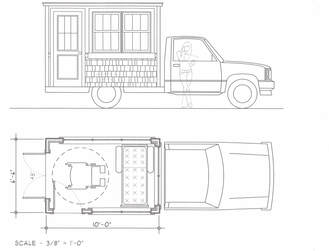
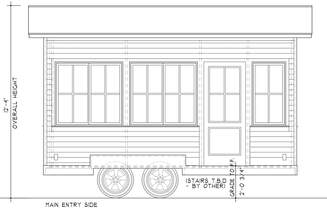
Trailer SizeWhat We Did: We wanted space for multiple visitors, a cure chair, and the wheelchair lift in the back. The lift requires 5.2 square feet at the end of the trailer. To maintain the look of a cure porch when the lift isn't in use, we designed a second set of french doors hiding the lift. With this in mind, we chose a 16' long trailer with a GVW of 10,000lb. In terms of width, the structure needs to be built to the width of the trailer, so that water doesn't pool around the base of the walls. We ordered a trailer that is the standard 8' width. We designed the porch to be 8' wide, with a 3" roof overhang on either side. (The overhang could not be more than that, as trailers and the structures on them cannot exceed 8'6.")
|
|
How it Works in Practice: The 16' long trailer gives us lots of space. We make use of it with mini exhibits, and during busy events it's nice to be able to fit so many people in the space. But we could have made do with a shorter trailer! Also, we have discovered that having such a small roof overhang exposes the siding to more weather and causes the Porch door to get iced shut in winter.
Our Suggestion: Buy a smaller trailer! Remember, the longer the trailer is the more difficult it is to park, house, and tow. And don't underestimate the importance of a roof overhang for protecting the structure. We could have given up a few inches on the inside to make sure the roof protects the structure. We wish we had ordered a 7'6" trailer, built to 7'6" wide, with a 6" overhang on each side.
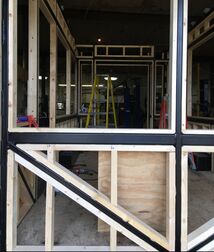
The Support Structure
|
What We Did: With three sides of wall-to-wall windows there is very little space for structural support in a cure porch. We needed a steel frame to make it road-worthy. This added another $10,000 to the projected project cost and a lot more weight to the structure. Our trailer has a GVW of 10,000 lbs. which was more than enough to support the extra weight of steel.
How it Works in Practice: With a steel frame, we have total confidence that this structure will last. With the increased weight of the Porch it takes a bigger truck to tow. It also complicated the construction and electrical wiring.
|
Our Suggestion: Seek the advice and input from contractors who build and transport tiny houses, and consider building a steel frame for stability. Make sure you budget for this extra cost!
Safe for the Road
|
What We Did: A moving vehicle is subject to high winds that impact the windows and roofing. We knew the roof needed to be very secure, and so while most of the Porch was volunteer built, we had the roof installed by a professional. The hitch-side windows are made of plexiglass, to prevent them shattering from debris kicked up by the towing vehicle. The other windows are made from tempered glass. Hurricane windows are a good option! We considered using shutters to protect the windows. But with no wall space to open to, traditional shutters wouldn't be functional. Removable shutters would require a ladder. With plexiglass windows on the hitch side, we decided an extra covering wasn't necessary.
|
How it Worked in Practice: No broken windows and we haven't lost a shingle yet!
Our Suggestion: Budget the extra funds so that experts can install key elements like the roof. If you want temporary window protection while driving, consider using foam board insulation. It's light, and you can easily cut it to size.
Lights
What We Did: We wanted outlets and lights on the Porch, and we planned on using the Porch in areas without electricity. We researched many possible options and purchased the GoPower 190 Watt Weekender solar charging system which includes a 190W solar panel and a 1500W pure sine wave inverter. We use it with two Fullriver DC85-12 deep-cycle 12V batteries.
How it Works in Practice: The 190 watt package is plenty for our use! It is enough to run our LED ceiling light, a tablet, the Story Phone, the handicap lift, and charge your phone. In winter we have to clear the solar panel of snow regularly. Even when snow and clouds prevent the batteries from being fully charged, we can plug the Porch into an outlet to top off the batteries.
Our Suggestion: Ask your local RV camper and trailer dealer for help with solar panels and heating. Our local dealer, Happy Camping in Vermontville, NY, was a big help!
Heat
What We Did: We bought the Atwood Furnace model ASFD20141, along with the exterior furnace door, digital thermostat, and furnace vent kit from our local RV dealer, Happy Camping.
How it Works in Practice: The heater is great for making our cure porch a 4 season venue! We use a 5 gallon propane tank and an easy quick-connect propane hookup. The hose stay's connected to our propane tank, and the tank is securely stored outside our museum when not in use. If we need to turn on the heat, we just set the tank behind the Porch, and use the quick-connect propane hose to attach to the fitting.
Our Suggestion: Make sure you have plenty of room for your heater before building your venue! The removable quick-connect hose and 5 gallon tank works well for us, but you might want to consider using an RV setup: a permanent propane pipe running underneath the trailer to a propane tank cradle on the hitch.
Site planning
|
What We Did: We knew we wanted to park the Porch at the museum while not in use, and we wanted museum visitors to be able to explore it too!
How it Works in Practice: It turns out that we designed the porch with the door on the wrong side for it to work with our original parking plan. Luckily, having recently purchasing the adjoining property, we are able to park it in a way that's easy for the towing company, and has the entrance facing the right way. We often wish we had a roof to park the porch under to protect it from the weather.
Our Suggestion: Plan ahead for where you are going to park your mobile exhibit space. Consider how visitors will enter it and how you will need to tow it on and off the property.
|
|
